It's September 1!! YAY! That means the Holiday Catalog is now LIVE for YOU!! Click on the photo of the catalog here to view it, and ask me for your copy if you haven't received one from me yet!!
There's also an awesome new stamp set you can get FREE! It's called Merry Patterns, and it's adorable. Click here to see the flyer! It's FREE with a $300 order or $300 in combined orders! So, you and your friends can combine orders to get it free. And, a $300 order also receives $36 in FREE merchandise of your choice!
And, if you order online with the monthly host code, you'll also receive a FREE class in the mail from me (details below!).
Here are some samples using Holiday Catalog Product. These projects are from my Customer Appreciation Class last weekend. Many of the projects were inspired from other stampers!:
1.
Fold the 5 1/2 x 8 /12 Very Vanilla card base in
half. Stamp and sign the back. Set aside.
2.
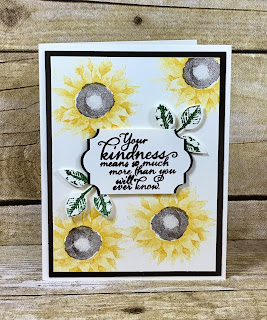
All stamps on this card are from Painted Harvest
(Bundle and Save!) from the Holiday Catalog.
3.
On the 3 3/4 x 5 Very Vanilla cardstock, FIRST
ink up the larger sunflower image in Crushed Curry ink. THEN STAMP IT ON THE SCRATCH PAPER on the
Foam Mat. THEN stamp on the card. Repeat three times.
4.
THEN ink up the smaller sunflower image in
Crushed Curry and stamp on top of the first one (full strength ink). Repeat three times. *You can line up the center of the flower
when stamping.
5.
Add the center in Early Espresso.
6.
On your one scrap of 2 x 6 1/4 Very Vanilla
cardstock IN YOUR BAGGIE, stamp the two leaves first in Garden Green ink, then
the greeting in Early Espresso ink.
Punch out with the Leaf Punch from the Holiday Catalog (Bundle and
Save!) and the Everyday Label Punch from the Holiday Catalog (Bundle and
Save!).
7.
Cut off the two ends of the pre-punched Early
Espresso Everyday Label Punch. Attach
them to the sides/back of the greeting.
Attach the leaves to that.
1.
Fold the 5 1/2 x 8 /12 Whisper White card base
in half. Stamp and sign the back. Set aside.
2.
All stamps on this card are from Every Good Wish
from the Holiday Catalog.
3.
Rock and Roll Technique: IMPORTANT: First clean
off the stamp on your scratch paper.
Second ink up in Soft Sky ink.
Third roll the edges on the Marina Mist pad. Fourth stamp on the 2 1/2 x 3 Watercolor
Paper. Fifth CLEAN THE STAMP ON YOUR
SCRATCH PAPER. The cleaning is important
of the lighter color ink pad will just turn to the same color as the dark pad.
4.
On the 3 3/4 x 5 Soft Sky cardstock, stamp the
dots in Soft Sky ink - stamp two times before re-inking.
5.
Attach the soft sky cardstock to the 4 x 5 1/4
Marina Mist cardstock. Attach to card
base.
6.
Attach the watercolor paper to the 2 3/4 x 3 1/4
Silver Foil Paper. Attach to the card
front.
1.
Fold the 5 1/2 x 8 /12 Whisper White card base
in half. Stamp and sign the back. Set aside.
2.
All stamps on this card are from Carols of
Christmas (Bundle and Save!) from the Holiday Catalog - AND IT'S AVAILABLE TO
PURCHASE THIS MONTH.
3.
On the 2 1/2 x 2 1/2 Whisper White cardstock,
stamp the greeting in Garden Green ink.
Attach to the 2 3/4 x 2 3/4 Garden Green cardstock.
4.
Assemble!
5.
Attach the pre-embossed 3 3/4 x 5 Softly Falling
Whisper White cardstock to the 4 x 5 1/4 Garden Green cardstock. Attach to the card base.
6.
Add the three pre-die cut Garden Green trees
(two dies) from the Card Front Builder Dies (Bundle and Save!).
7.
Add the 2 x 3 3/4 Wood Textures designer paper.
8.
Add the greeting with Stampin'
Dimensionals. Use the Silicone Craft
Sheet to add adhesive to the pre-die cut Copper Foil deer from the Card Front
Builder Dies (Bundle and Save!) and add to the greeting.
Here are the supplies used:
Contact me with any questions about the projects!
I would
love to be YOUR Stamp Therapist!
Contact me to get your copies of the current catalog(s)! If you need any help ordering your supplies,
just let me know!
jennifer@jennifercotton.com
 |
| Catalog Images |
September Monthly
Class Kit in the Mail Club: Place your online order of $25 or more in September 2017 with the host code AB4ES9TX (entered
on shopping bag page, bottom left), and you will receive a FREE Class packet to make FOUR CARDS using Painted Harvest Bundle from
the Holiday Catalog. Everything possible will
be cut, punched, and die cut for you! You’ll just stamp and assemble. I always
email you a written tutorial with photos and measurements, too! You’ll just stamp and assemble.
*Order $50
and ALSO get a free accessory from me!
*Exception: You qualify
for both specials if you spend $150 or more online, but do NOT enter the
hostess code because YOU will be a hostess and receive FREE merchandise from
Stampin' Up!!
2017 New
Customers Offer: Your first online order of $25 or more will
receive a free Silicone Craft Sheet from me!
Use the monthly Host Code on the Shopping Bag page (bottom left hand
side) when ordering to ALSO qualify for the Monthly Special. Check out this video to see why I love the
Silicone Craft Sheet!
2017 Big
Shot Offer: Do you own the Big Shot?
It’s an AMAZING TOOL! When you
purchase the Big Shot from me, you will receive your choice of the Magnetic
Platform or the Precision Base Plate FREE!!
Reminder:
Stampin’ Up!’s Special: Orders of $300 or more in September and October 2017 receive the Merry Patterns stamp set free!
Have a GREAT week!
Jennifer
jennifer@jennifercotton.com


