Saturday, May 16, 2020

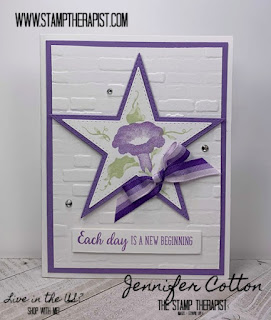
Three cards using Stampin' Up!'s Morning Star

Hey everyone!

Here are the three cards from this week's Facebook Live!  I used the retiring Morning Star stamp set.  Retiring stamps will be while supplies last after May 22!!

This Highland Heather card uses Stampin' Up!'s Morning Star set (it's retiring June 3, 2020!).  The background is the Brick & Mortar embossing folder.  Check the blog for more info and a video! #StampTherapist #StampinUp
This Blueberry Bushel & Garden Green card uses Stampin' Up!'s Morning Star set (it's retiring June 3, 2020!).  Check the blog for more info and a video! #StampTherapist #StampinUp
This Graduation/Proud of You card uses Stampin' Up!'s Morning Star set (it's retiring June 3, 2020!).  The background is the Swirls & Curls embossing folder (also retiring).  I think it's a good Dallas Cowboys card, too!  Check the blog for more info and a video! #StampTherapist #StampinUp

You can watch my Facebook Live each Thursday at 9:00 am Central Time on my Business Facebook Page, and you can watch the video for these cards here if you don't have Facebook:


 Here are the main supplies I used:


Have you checked out the retiring lists and what's on SALE yet?!  Our retiring list has been released, and lots of items are discounted (20-85%!!). Here are the two lists, but it's easiest to view the Last-Chance Products on my online store:
Don't forget, if you place an online order of $25 or more in May 2020 with the host code GEVMYQVU  (entered on shopping bag page, bottom left), you will receive a class kit in the mail to make four cards using the A Good Man set, and if it's $50 or more, you'll also receive a free full accessory!  More info here!
Thanks so much!
Jennifer
jennifer@jennifercotton.com
972-723-9289
https://stampwithjennifer.blogspot.com/p/blog-page.html

https://stampwithjennifer.blogspot.com/2020/05/jennifers-may-2020-online-ordering.html 
http://www.stampinup.com/ECWeb/default.aspx?dbwsdemoid=42586
http://www.mystampinstuff.com

Sunday, May 10, 2020

Happy Mother's Day!

Happy Mother's Day everyone!!

Here is a card from my Bingo Class.  I hope your day is wonderful (whether you're a mom or not!!).

This pink Mother's Day Card uses Stampin' Up!'s Timeless Tulips Bundle (includes the Tulip Builder Punch).  The instructions are on the blog - click the picture to go there!)  #StampTherapist #StampinUp

This pink Mother's Day Card uses Stampin' Up!'s Timeless Tulips Bundle (includes the Tulip Builder Punch).  The instructions are on the blog - click the picture to go there!)  #StampTherapist #StampinUp


  1. Fold the 5 1/2 x 8 1/2 Petal Pink card base in half.  Fold the front back.  Stamp and sign the back. 
  2. If your stamping surface is not very firm and smooth, place a foam mat or catalog under your cardstock for stamping with Photopolymer stamps.  I recommend the Stamparatus Deluxe Foam Mat. 
  3. We are using the Timeless Tulips Bundle (p 43 - Timeless Tulips Set & Tulip Builder Punch).
  4. On the smaller 3 x 4 Whisper White cardstock, stamp the three tulips first in Petal Pink ink. Add the three stems in Pear Pizzazz ink (I used the straight one for the two outside tulips and the curved one for the center). 
  5. There are two pieces of 3 3/4 x 5 Whisper White cardstock.  One is for the inside.  On that one, stamp the greeting in Pear Pizzazz ink.  Stamp the flower next in Petal Pink ink, then add the straight stem and two leaves in Pear Pizzazz ink.
  6. **ATTACH THIS ONE INSIDE BEFORE ASSEMBLING THE FRONT.
  7. From your 6 x 6 Subtles Designer Paper: **First cut off 2 1/2" from your Petal Pink designer paper for your envelope.  Now cut the leftover piece to 3 1/2 x 4 3/4.  
  8. Attach the designer paper to the other 3 3/4 x 5 white piece.  Attach the front stamped piece to that. 
  9. After the inside piece has been attached, add adhesive to the LEFT BACK of the front piece ONLY and attach directly over the back white piece so it's fully covered
  10. Tie your White Flax Ribbon in a bow and attach with a Mini Glue Dot.  Use the Take Your Pick Tool to add one of each size Rhinestone.
  11. Add adhesive to the flap of your Whisper White Envelope and attach the 2 1/2 strip of designer paper.  Hand cut off the excess around the envelope.
For Photopolymer stamps (the totally clear ones), use a FOAM MAT on plastic/flexible tables.  DO NOT press hard into the ink pads*.  Just tap gently on the ink pad moving the stamp around to different spots several times.  *EXCEPTION: do press hard on our BLACK and Staz On ink pads.

Here are the supplies used for this card:


Have a great day!!
Jennifer
jennifer@jennifercotton.com
972-723-9289